Sometimes, we start a print and go to sleep or we start a print and go to college or office. When the print is complete, the printer stays on until we come back and turn it off or if the electricity goes out and comes back, the printer keeps on displaying the resume print option. Fortunately, Marlin has an option using which we can turn the mains power to the power supply off once the print is complete. In this post, I will present you with a DIY circuit for this job and also explain the firmware and slicer settings to make this circuit work.
The Circuit
The circuit is very simple. We are using the signal from the mainboard to trigger a relay using a transistor. The flyback diode is there to prevent the transistor from damaging. Following components are required to build the circuit:
- NPN transistor. I have used 2N3904 but any NPN transistor such as 2N2222 or BC458 will work.
- 1N40007 diode. Any other diode can be used also.
- A 12V relay
- A 1kohm resistor
- Appropriate connectors of your choice. I have used a block connector, a 2 pin JST connector and a 3 pin JST connector.
- PCB or a Veroboard to make the circuit
The circuit diagram is as follows:
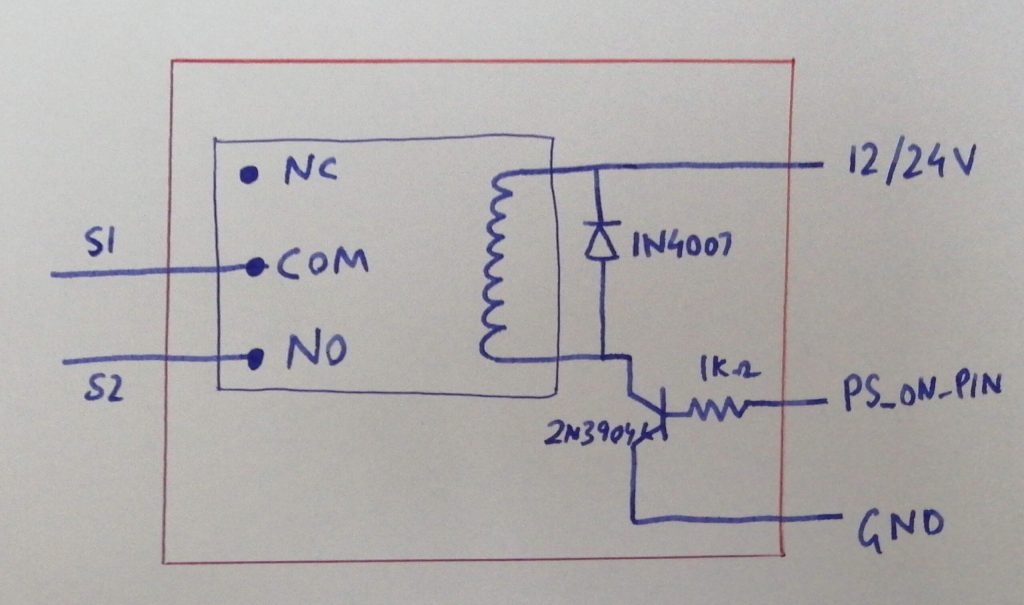
The 3 pins on the right, i.e. 12/24V, PS_ON_PIN and GND will be connected to the mainboard. If you are using a 12V relay and your printer is 24V, take 2 pieces of quarter watt 470ohm resistors, put them in parallel (so equivalent resistance will become 235 ohm and equivalent power will become 0.5W). Put this combination in series with the 12/24V wire so it will reduce the current to the relay’s coil.
The terminals on the right, i.e. S1 and S2 will be connected in parallel with the switch in the socket that your printer is plugged in to. I have shown it in the following diagram:
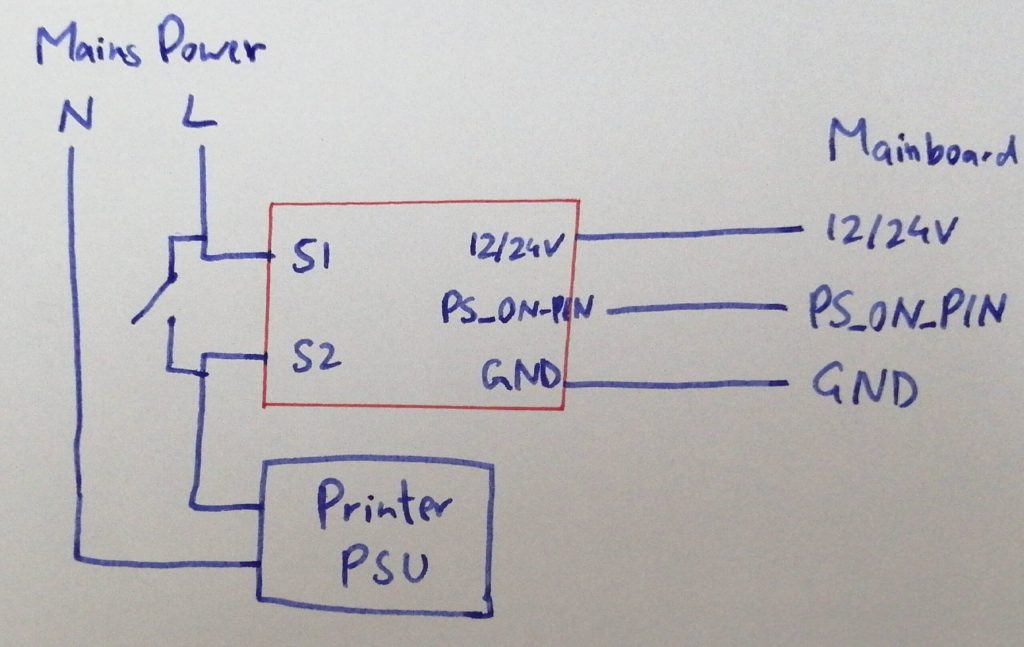
In this way, if either that switch or the relay is on, the printer will be on and otherwise, it will be off. This is like the OR operation on the relay and the switch. To switch the printer on, we will turn on the switch and as soon as the printer powers up, the mainboard will turn on the module’s relay and now if you turn off the switch (you have to turn it off), the printer will still be on. When the printer is complete, it will turn off the relay in the module and hence, the mains power to the power supply will be cut and it will be off.
The circuit can be made on veroboard or PCB. The PCB layout is very simple and can be made using the DIY toner transfer method as well. I made the pinout suitable for my SKR 1.3. The 2 pin JST connector will plug in to the hotend fan port and the 3 pin JST will be plugged in to a spare endstop connector.
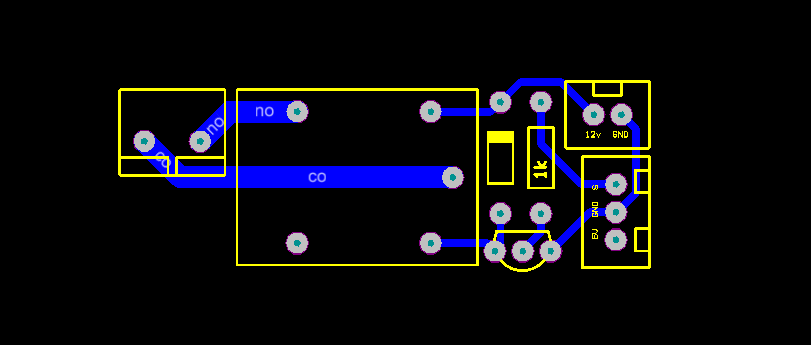
The gerber files can be downloaded from here and the pdf can be downloaded from here. I have put the casing for this PCB on thingiverse as well.
Firmware Settings
There is M81 command in Marlin that allows you to control the power supply. We need to do a few firmware tweaks and then we can put this command in the end gcode in the slicer to turn off the printer after the print is complete.
I am using the Marlin version 2.0.9.3.
- In Configuration.h, uncomment #define PSU_CONTROL
- In Configuration.h, make the active state of the power supply high by settings #define PSU_ACTIVE_STATE HIGH
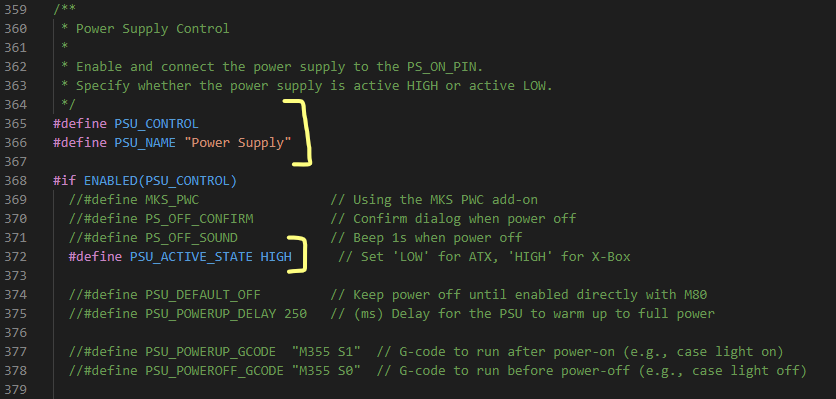
Now we need to check if your board has a PS_ON_PIN by default or we can define some other pin for this purpose. This step depends on the board that you are using. I am using the SKR1.3 board, so I locate its pins file in Marlin.
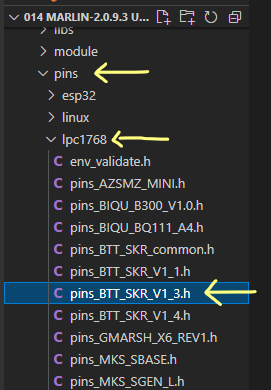
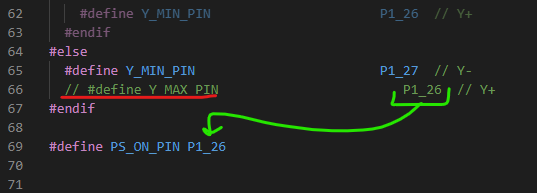
There is no PS_ON_PIN by default, so I have commented out the Y_MAX_PIN and defined it as the PS_ON_PIN
This was all from the firmware side.
Slicer Configurations
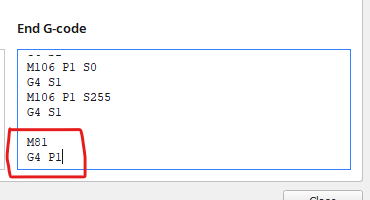
In whatever slicer you are using, you just need to add 2 lines of GCODE at the end of the end gcode.
M81
G4 P1
M81 will turn of the power supply and G4 P1 will introduce a wait of 1 millisecond. This wait is necessary as I have observed that the printer causes problems without it.
The setup is complete. Now you can start a print and watch your printer automatically turn off after the print is complete.
If you are from Pakistan, you can contact me if you want to buy this module from me.
0 Comments